SEC S20W1 - A Comprehensive Guide to Flutter Mobile Application Development

Hello steemians,
I am excited to announce my participation in teacher Mohammadfaisal's contest on mobile application development with Flutter. This contest, in conjunction with his detailed article "A Comprehensive Guide to Flutter Mobile Application Development", is a great opportunity to share my programming skills while learning more about this powerful technology. Looking forward to this challenge and interacting with the community!
Introduction to Flutter and Setting Up the Environment. Write a short paragraph about what Flutter is, its benefits, and why it is used for mobile app development. Include how it differs from other frameworks.
Flutter is an open-source UI development kit developed by Google that I have recently been exploring in my mobile projects. It allows you to build apps for multiple platforms, including Android and iOS, from a single codebase which greatly simplifies the development process. What I like about Flutter is the speed of development thanks to its "hot reload" concept which allows me to instantly see changes in the app without having to restart it. In addition, Flutter offers a large library of customizable widgets which helps me design modern and consistent UIs with maximum flexibility.
One of the main differences I noticed compared to other frameworks like React Native is that Flutter uses the Dart language and compiles directly to native code. This eliminates the need for an intermediary bridge like the one used by React Native which results in better performance, especially on older devices. In short, thanks to Flutter, I can not only speed up development but also ensure a smooth and responsive user experience across all platforms.
Install Flutter SDK, set up an IDE (e.g., Visual Studio Code or Android Studio), and configure an emulator or physical device for testing.
Here is the step-by-step breakdown of my experience to set up Flutter and launch my first mobile app on a physical device:
1. Downloading Flutter SDK
I started by downloading the Flutter SDK file from the official website. As shown in the first image (file named flutter_windows_3.24.2-stable.zip), I then extracted this file and placed it in a dedicated folder on my local drive, named C:\flutter.

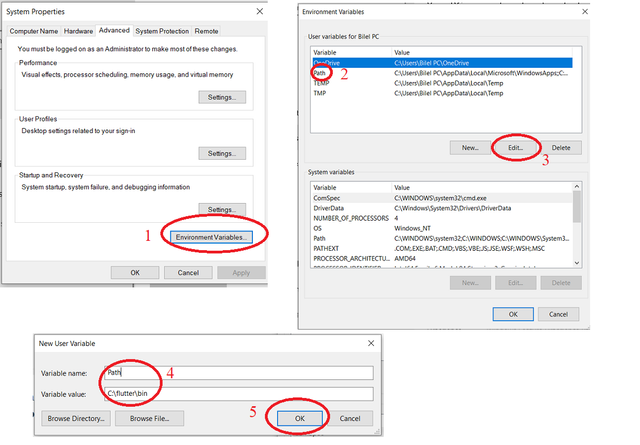
2. Configuring environment variables
Next, I configured the environment variables so that Flutter could be recognized in the command line. To do this:
- I opened the System Properties and navigated to the Environment Variables (as shown in the third image).
- I added the path to the
C:\flutter\binfolder in thePATHvariable so that I can use the Flutter command from any directory in the terminal.
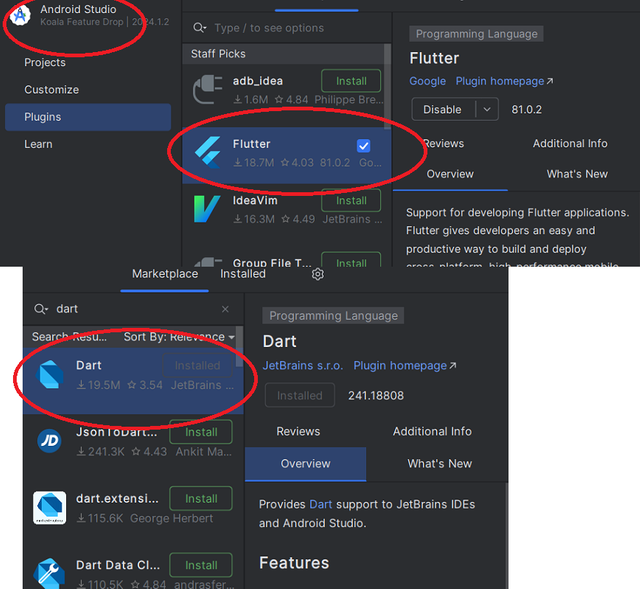
3. Android Studio IDE Installation and Setup
Instead of using Visual Studio Code, I chose Android Studio as my Integrated Development Environment (IDE) because it provides a more comprehensive set of tools for mobile app development:
- I downloaded and installed Android Studio.
- Next, I opened Android Studio and installed the Flutter and Dart plugins from File > Settings > Plugins, which allowed me to develop in Flutter directly in the IDE.
4. Downloading Flutter dependencies
After installation, I ran the following command in the terminal to verify that Flutter was installed and to download all the necessary dependencies:
flutter doctor
This command allowed me to make sure that all the installations were correct and indicated any missing items (such as the installation of some Android components).

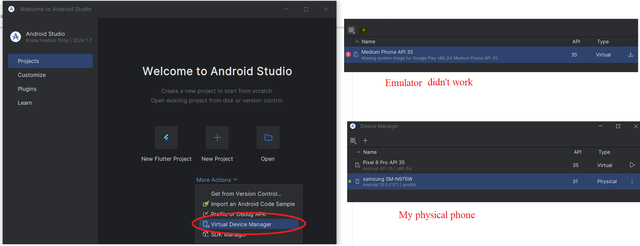
5. Setting up a physical device to test the application
Since I couldn't launch the Android emulator built into Android Studio (probably due to a hardware or software configuration of the computer), I decided to connect my physical phone:
- I enabled developer mode and USB debugging on my phone.
- Then, I connected the phone to my computer via a USB cable.
Android Studio immediately recognized my device, and after selecting it as the deployment target, I was able to test the app directly on the phone.
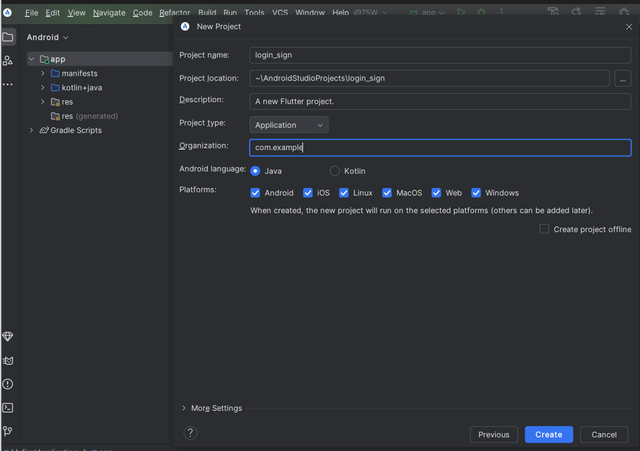
6. Running the Flutter starter app
Finally, to verify that everything was working properly, I created a new Flutter app using Android Studio. This app is the default project provided by Flutter, with a simple click counter.
- To do this, I used the command:
flutter create my_first_app
- I opened this project in Android Studio, then clicked Run after selecting my physical phone as the target device. The app was successfully deployed to my phone, allowing me to test the basic functionality of Flutter directly on a real device.
Note
Although I was unable to launch the Android emulator on my computer, the process of connecting and deploying to a physical device was quick and easy. This allowed me to directly see the performance of the app on a phone and appreciate the fluidity and speed of Flutter for cross-platform development.
This experience gave me a clear understanding of the process of setting up the Flutter environment and helped me overcome the challenges of connecting a physical device to test my apps.
Access DartPad and perform the following:
- Write a function that prints numbers from 1 to 100. For multiples of 3, print "Steem" for multiples of 5, print "TRX" and for multiples of both, print "Steemit.com".
I accessed DartPad and completed the task by writing a function to print numbers from 1 to 100. Here's how I approached it:
I first set up a for loop that iterates through the numbers from 1 to 100. Inside the loop, I used conditional statements to check for multiples of 3, 5, and both. For multiples of 3, I printed "Steem," for multiples of 5
Here's the Dart code I used:
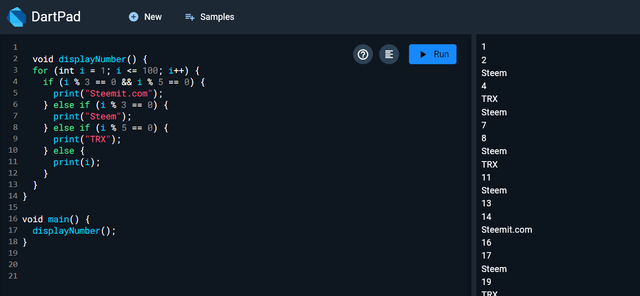
After writing the function, I ran the code in DartPad, and it successfully printed the numbers with the specified conditions. This task helped me further explore conditional logic in Dart, as well as how to use loops for repetitive tasks efficiently.
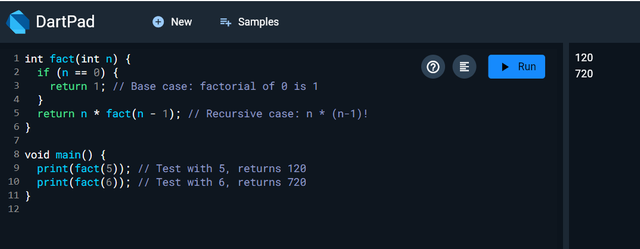
- Create a Dart function that calculates and returns the factorial of a given number. Test the function with different inputs.
For Task 2, I implemented a recursive function in Dart to calculate the factorial of a number. I utilized an if statement to check if the input number n is 0, as the factorial of 0 is defined as 1. For any other value of n, the function recursively calls itself with n-1 until it reaches 0.
Here's the Dart code I wrote:
How it works:
- Base Case: If
nis 0, it returns 1, stopping the recursion. - Recursive Case: For any number greater than 0, it multiplies
nby the factorial ofn-1, continually reducingnuntil it reaches 0.
I tested the function with n = 5 and n = 6:
- For
fact(5), the result is 120. - For
fact(6), the result is 720.
This function effectively demonstrates recursion, a key concept in programming, and how it simplifies tasks like computing factorials.
Connect a physical device to the computer and enable developer mode and USB debugging. Configure Android Studio to recognize the connected device and run a Flutter app on it. Run a basic Flutter app on the physical device and verify its functionality.
Here are the steps I followed to connect a physical device to my computer, set up Android Studio, and test a Flutter app:
1. Connecting the physical device and enabling developer mode:
- First, I connected my phone to my computer via a USB cable.
- Next, I enabled developer mode on my phone by going to Settings > About phone > and tapping on "Build number" 7 times.
- Once developer mode was enabled, I went to Developer options and enabled the USB debugging option.
2. Configure Android Studio to recognize the device:
- I launched Android Studio and opened the Flutter project that I had initially set up.
- To get my device recognized, I went to the Device Manager tab, but since I couldn't launch an emulator, I decided to use my physical phone.
- Android Studio automatically detected my USB-connected device, and my phone's name appeared in the toolbar at the top.
3. Running a Flutter app on the device:
- Once the device was recognized, I clicked the Run button in Android Studio.
- The default Flutter app (the starter app with the "Increment" button) was installed on my phone.
- I could see the Flutter app running properly on my physical phone.
4. Functionality check:
- On my phone, I tested the app by clicking the "Increment" button to verify that the counter was increasing with each click.
- Everything worked as expected, allowing me to confirm that the Flutter app was successfully deployed to my physical device.
These steps allowed me to test a Flutter app using my phone as a test device, providing a convenient solution when the emulator is not working.
Project: Sign Up and Log In Screen: Create a basic Sign Up and Log In Screen interface.
In this Flutter project, I created an application with two tabs, one for Login and another for Signup.
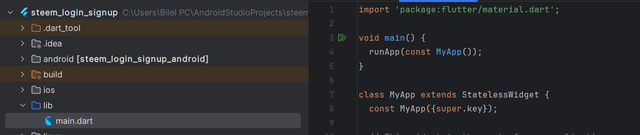
1. Basic application structure
- I started by defining the
main()function, which is the entry point of the application. I used therunApp()method to launch the application with the instance of myMyAppclass. - The
MyAppclass is a Stateless widget, which means that it does not manage mutable state.
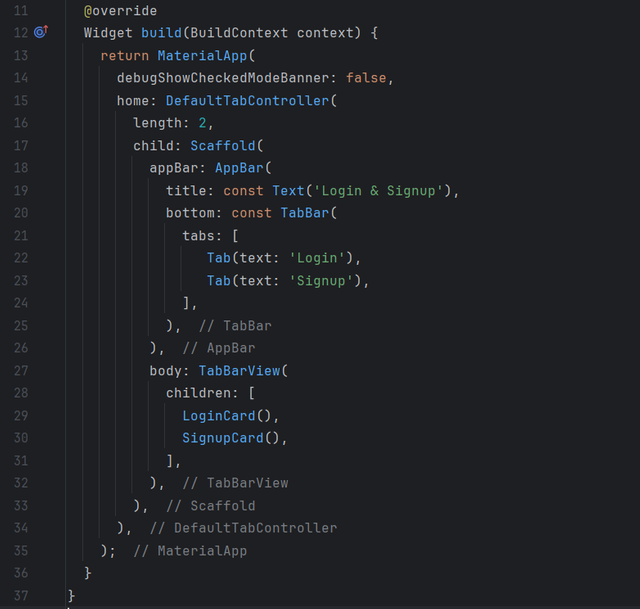
2. Flutter application configuration
I wrapped my application in a
MaterialAppwidget to benefit from the Material design components.I disabled the debug banner with
debugShowCheckedModeBanner: false.Then, I used a
DefaultTabControllerto manage two tabs, one for login and one for signup.In the
AppBar, I added a title called "Login & Signup", as well as a tab bar (TabBar) to switch between the two views.
3. Tab Management: Login and Signup
- I configured a
TabBarin theAppBarwith two tabs called "Login" and "Signup". - I then added a
TabBarViewto display the content corresponding to each tab. ThisTabBarViewcontains two separate widgets:LoginCardfor the login form, andSignupCardfor the signup form.
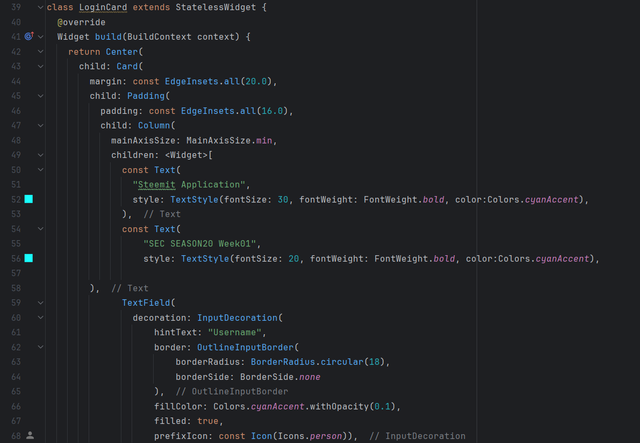
4. LoginCard Form
- For the login form, I created a
LoginCardwidget which is a stateless widget. - I centered this form in a
Card, and it contains: - A title "Steemit Application" and a sub-description "SEC SEASON20 Week01".
- I added a text field for the user to enter their username, with a person icon.
- I also included a text field for the password, which I made obscured using
obscureText: true. - I added a Login button, styled with a stadium border (
StadiumBorder), to allow the user to submit the login form. The login logic is not yet implemented in theonPressed.
5. Signup Card
- Similarly, I created a
SignupCardwidget for the signup, which contains: - A text field for the user's full name.
- Another field for the email.
- And finally, a field for the password (also hidden with
obscureText: true). - I also included a Signup button to submit this signup form, but the logic to handle the signup is not yet in place.
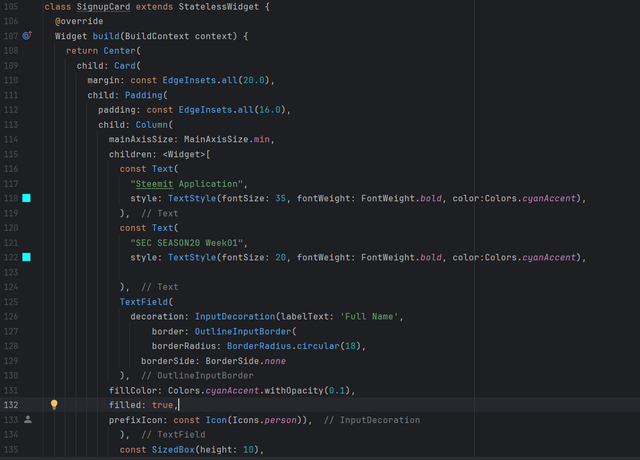
6. Interface Customization
- I added rounded borders to all text fields with an
OutlineInputBorderandborderRadiusof 18. - To improve the aesthetics, I chose a light cyan color (
Colors.cyanAccent.withOpacity(0.1)) to fill the text fields. - I used cyan as the main color throughout the interface, both for text and icons.
In this project, I designed a simple UI with two tabs for the user to log in or sign up. I added appropriate text fields and buttons for each action, although the logic behind the Login and Signup buttons remains to be implemented.
Demonstration video
Thank you very much for reading, it's time to invite my friends @khursheedanwar, @stream4u, @patjewell to participate in this contest.
Best Regards,
@kouba01

Oh, pensaba que la aplicación de Login y Sign up era un proyecto final de curso. Actualmente me encuentro preparando mi participación, establecer todo en Mac y iPhone fue una labor bastante larga, pero se logró.
¿Es necesario realizar el proyecto final? Aun estoy aprendiendo Dart...
Esta interesante el curso pero siento que es demasiada carga para una única tarea, incluso para personas que saben programar.
CC @mohammadfaisal
Wow amazing to know that you have completed the first task. It is said that if you have complete the installation of flutter framework you have covered your first step to learn flutter.
I agree with you that it can take time. But it is necessary to complete the project. It is just an interface of the Sign up and Log in screen and I know you can do it in a while. There is no use of dart in building that simple UI. Dart is used for the implementation of logic. You just need to add the widgets to form the UI. It will take very less time than the installation.
Moreover you have enough time to show your legendary skills it is not tough to do it is easy just stick to your point towards the completion. And I am sure you will achieve it.
If you need any help you can ask.
Moreover I have allocated 3 marks to task 1 and 3 marks to task 4 (project task) because of their importance. If you are unable to complete the project task you can still participate and you will get your marks accordingly. I will still appreciate your efforts and will give the marks of your efforts.
Best Wishes.
Thanks, I'll do my best to complete it.
You are welcome. Looking forward to see your splendid entry.
Well done!!
I gave this challenge one look and decided that it is not for me, although I would have liked to do it.
It just seems way too complicated. You must remember, I am now getting older, and to think is not something I like to do these days.
I will rather drink a cup of tea and watch the dolphins playing in the waves.
Thank you! I totally get it, sometimes it's nice to just relax and enjoy the simpler moments. Dolphin watching with a cup of tea sounds like a perfect way to spend the day!
I feel the same ☺️
Haha! How glad am I that there is someone else that feels like me.
Join the club! (•ิ‿•ิ)
😎
Your each task is full of brief details. Flutter is amazing platform which allows cross development. It saves time and money because of it's this feature. And another hot feature is hot reload which enables the changes to look on the screen without building the app again. Your colour choice is also good. You have chosen colour as per Steemit platform primary colour while mentioning Steemit on your log in and sign up screen.
#firstpost
Thank you!
Thank you, friend!


I'm @steem.history, who is steem witness.
Thank you for witnessvoting for me.
please click it!
(Go to https://steemit.com/~witnesses and type fbslo at the bottom of the page)
The weight is reduced because of the lack of Voting Power. If you vote for me as a witness, you can get my little vote.
Upvoted. Thank You for sending some of your rewards to @null. It will make Steem stronger.
I've always been interested in this, and you do a wonderful job of breaking it down.
This post has been upvoted/supported by Team 7 via @httr4life. Our team supports content that adds to the community.