Guide on how to draw the face - Basic Face Proportions
Guide on how to draw the face - Basic Face Proportions

I decided to start making guides and to help out fellow steemmates, who wish to try their hand at drawing :)
So of course, we need to start with the basics and that is on how to draw anatomically correct face.
This is the steriotypical proportioning of the face, and we are going to practice it first off by drawing the face in portrait.
So this is the template with all the steps, which I will be explaining underneath it. Feel free to draw along all the steps and to try it out for yourselves :)
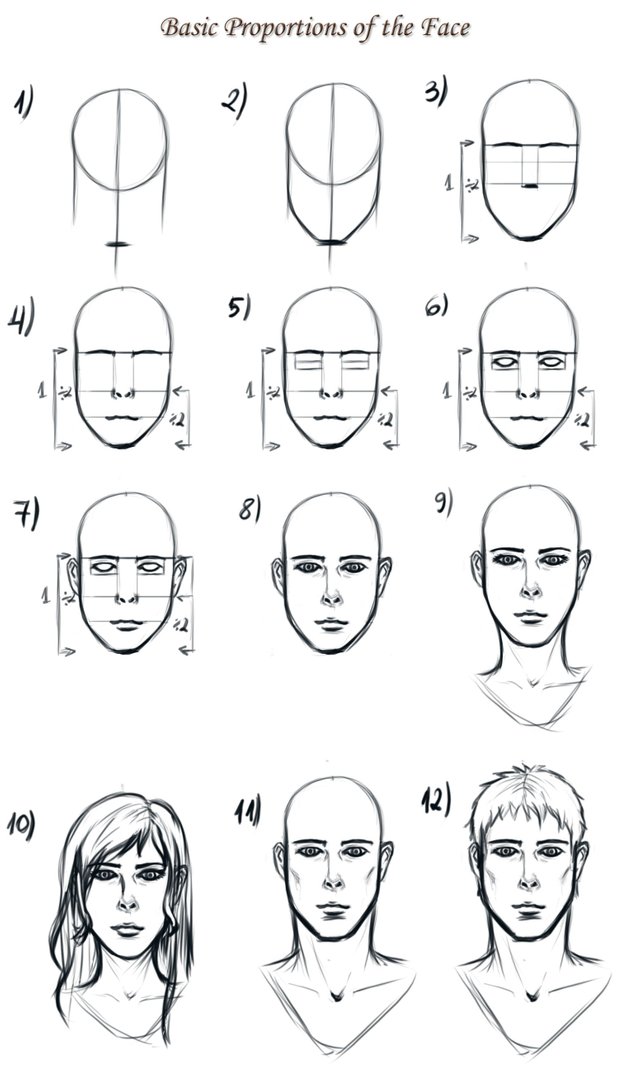
1) Draw a circle, after which we are going to draw a line going down the middle. Then draw lines extending from both sides of the circle. Draw a horizontal line crossing the middle one, this marks where the chin will be.
2) Connect the lines on the side with the one marking the chin, with which we create the jaw.
3) After we have the basic face shape, you don't want to have so many guidelines, therefore we can erase them. After that we need to mentally divide the face into 2 sections, drawing a line a bit above the middle marking where the eyebrows are. Don't connect the eyebrows all the way to the side of the face! If you look at yourself in the mirror, you will see that your eyebrows don't extend all the way to the sides.
We need to divide into 2 sections the part of the face from the eyebrows to the chin. The middle of this part marks where the nose is. Connect the end of the eyebrows with the nose - this marks where the end of the nose is.
4) We can mark where the nostrils are, to give it a better look. So now we are going to divide the part of the face between the nose and the chin, into two - that is where the mouth is located.
5) Now we reach the eyes. To express where the eyes are, we draw boxes right under the eyebrows and up to the nose. The middle of the box, on the axis with the nose marks where the tear duct starts.
6) The tear duct is on the same level as the end of the nose. We draw the eye shape. If you wish to have perfectly identical eyes, you can copy the first eye that you draw, paste it, flip it horizontally and adjust it inside the other box - this will give you perfectly symmetrical eyes.
7) To give it a better look we can add a bit of a lower lip. Now we are going to draw the ears. They are located in the space between the eyebrows and the nose.
8) So now that we have pretty much the finished face shape, we can erase all the guidelines. At this point the face looks quite robotic, right? :) No worries, to fix this, we can add pupils to the eyes, also add some eye creasing and define the nose, to give it some volume.
Right now the face could belong to either a female or a male. I will show you the differences between both!
9) First I decided to go with the female one. In order to make the face look more feminine we can 1) add eyelashes; 2) make the shape of the face rounder, so it will look more softer; 3) make the nose smaller (but be warned if you do this you may have to adjust the whole lower part of the face!) ; 4) and give her a slender neck, starting a bit under the jaw.
10) And for the final step we can add a typical female hairstyle, which will further point the gender.
11) As for the male version to make it look more musculine you can: 1) make the jawline more sculptured and sharp; 2) give him a bit of cheekbones; 3)make his neck thich, starting from where the ears end, if he is a bit more buff; 4) also you can make his eyebrows a bit more thick.
12) And for the final step I gave him a typical male hairstyle that is suitable.
<-------------------->
Hope you guys found this guide helpful! I know it is a lot to read, but trust me if you follow this and practice it, you will become way better at drawing faces. Knowing the proportions is the foundation of having your pictures look right. If any of you guys try it out, please be sure to share with me I would love to see your guys results! :)
Hi @hentikage thanks for posting your tutorials and amazing artwork.
I've been doing an art blog and I wrote an article on you. Hope you like it:
https://steemit.com/painting/@deimus/with-steem-power-comes-steem-responsibility-8-featuring-the-artwork-of-hentikage
Thank you very much!
Sorry for the late reply, I havent been able to be online much lately.
Wow! Thank you so much for this great honor!! Keep up the great work. Its really admirable that you give recognition to people, who you deem worthy of it :)
Will surely follow you, in order to support you and the gems that you find.
Thank you for the support!
It's a pleasure, you certainly deserve it. It's been a great series so far and I've connected with some awesome people. I look forward to seeing more of your artwork, you are really talented!
Thanks ^_^
I will be sure to check your blog, I am certain that you will be sharing some great talents with us!
Good article ! Just one addition - when you draw a circle, the horizontal diametre marks the exact position ( horizontal position) of the eyes.
Yes, that is also one way to mark where the eyes are situated :)
I just always draw them based on the place of the eyebrows and nose, so that's how I explained it here as well
Thanks for the comment!
Those are good tips! My old art teacher would make us carry around sketchbooks and draw people in public to get practice because there are so many different face shapes!
Practice is key that is true. The more you draw, the better you get :)
Indeed, every face is different! This is just the steriotypical one, which can give great foundation. After learning the basics its the most fun to experiment with different shapes :)
Thank you for the nice comment
Was looking for something to polish my drawing skills, thank you! Upvoted and followed!
Thank you! If you do try be sure to share :) Would love to see your result!
And thanks for the support, will follow back
Nice tutorial, thanks so much for sharing!
Thanks! :)
Looks like it helped many artists as you got 50+ votes. That's awesome. Which drawing tablet do you use?
Sorry for the late reply. I didn't have the chance to be online much these last days.
I don't have a fancy tablet. Few days ago I even used a crappy one for around 20 bucks. 1 week ago I bought Parblo A610 - it is again not that expencive, it's around 50 USD
very good guide check out my face .
UPVOTE FOR THIS GREAT POST
https://steemit.com/art/@venela/how-beautiful-is-to-smile-enjoy-the-drawing
will check it out!
Thanks for the support :)